

Game Information
ENGIE Stadium
| fourth Quarter | |||
|---|---|---|---|
| Time | Team | Play | Score |
| 23:47 |  | J. Gunston Goal | 48 - 91 |
| 22:53 |  | S. Weideman Behind | 42 - 91 |
| 18:20 | | B. Fritsch Goal | 42 - 90 |
| 14:57 | | S. Weideman Goal | 42 - 84 |
| 12:01 | | J. Morris Goal | 42 - 78 |
| 9:31 | | C. Wingard Goal | 36 - 78 |
| 0:59 | | C. Petracca Goal | 30 - 78 |
| third Quarter | |||
| Time | Team | Play | Score |
| 24:23 | | K. Pickett Goal | 30 - 72 |
| 22:25 | | L. Jackson Goal | 30 - 66 |
| 20:24 | | S. Weideman Behind | 30 - 60 |
| 17:32 | | J. Melksham Goal | 30 - 59 |
| 15:42 | | Rushed | 30 - 53 |
| 13:42 | | S. Weideman Goal | 29 - 53 |
| 10:38 | | J. Harmes Behind | 29 - 47 |
| 9:20 | | D. Minchington Behind | 29 - 46 |
| 7:11 | | C. Wingard Goal | 28 - 46 |
| 2:54 | | J. Gunston Goal | 22 - 46 |
| 1:31 | | S. Burgoyne Behind | 16 - 46 |
| 0:16 | | J. Viney Behind | 15 - 46 |
| second Quarter | |||
| Time | Team | Play | Score |
| 22:25 | | Rushed | 15 - 45 |
| 17:59 | | K. Pickett Goal | 14 - 45 |
| 13:29 | | H. Bennell Goal | 14 - 39 |
| 11:49 | | J. O'Meara Goal | 14 - 33 |
| 10:14 | | S. Weideman Goal | 8 - 33 |
| 7:34 | | M. Hannan Goal | 8 - 27 |
| 6:22 | | C. Petracca Behind | 8 - 21 |
| first Quarter | |||
| Time | Team | Play | Score |
| 21:51 | | B. Fritsch Goal | 8 - 20 |
| 18:15 | | J. Viney Goal | 8 - 14 |
| 15:37 | | M. Hannan Goal | 8 - 8 |
| 14:09 | | B. Fritsch Behind | 8 - 2 |
| 8:09 | | J. Morris Behind | 8 - 1 |
| 6:07 | | B. Fritsch Behind | 7 - 1 |
| 5:09 | | M. Lewis Behind | 7 - 0 |
| 1:09 | | J. Gunston Goal | 6 - 0 |
The Tiger's small forward Rhyan Mansell producing an outstanding first quarter goal in Richmond's clash against Carlton.
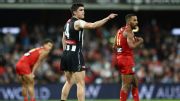
Things get heated at half time between Gold Coast and Collingwood.
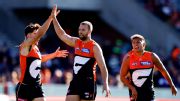
GWS end Fremantle's club-record 14-game winning streak with a 21-point win at Manuka Oval.
Tasmania wants experience, Carlton is betting on untapped talent, and Essendon wants to keep its search within the family. It's fascinating watching three very different recruitment methods at play, writes Rohan Connolly.
Round 17 of the 2026 AFL season kicks off with a Thursday night blockbuster between Geelong and Brisbane at GMHBA Stadium. Then, on Friday evening, Sydney and the Western Bulldogs do battle at the SCG.
On Red Time, Mason Cox says AFL clubs face a delicate balance between prioritising player wellbeing and protecting themselves financially.
| POS | Team | Pts. | % | Form |
|---|---|---|---|---|
| 1 |
 FRE FRE
|
56 | 141.6 | WWWWL |
| 2 |
 SYD SYD
|
52 | 136.9 | WWWLW |
| 3 |
 HAW HAW
|
42 | 110.0 | WLWWL |
| 4 |
 BL BL
|
40 | 111.7 | LWWWW |
| 5 |
 ADEL ADEL
|
40 | 111.4 | WWWLW |
| 6 |
 MELB MELB
|
40 | 106.3 | LWWLW |
| 7 |
 GEEL GEEL
|
36 | 117.1 | LLWLL |
| 8 |
 WB WB
|
36 | 90.8 | WWLWL |
| 9 |
 COLL COLL
|
34 | 104.4 | LLWWW |
| 10 |
 CARL CARL
|
32 | 96.0 | WWWWW |
| 11 |
 NMFC NMFC
|
32 | 92.2 | WLWWW |
| 12 |
 GWS GWS
|
28 | 100.8 | WLLLW |
| 13 |
 SUNS SUNS
|
28 | 100.7 | LLLLL |
| 14 |
 STK STK
|
24 | 100.6 | LLLWL |
| 15 |
 PORT PORT
|
20 | 100.9 | LWLLW |
| 16 |
 WCE WCE
|
16 | 71.5 | WLLLL |
| 17 |
 RICH RICH
|
8 | 63.3 | LLLLL |
| 18 |
 ESS ESS
|
4 | 71.0 | LLLLL |