


Game Information
People First Stadium
| fourth Quarter | |||
|---|---|---|---|
| Time | Team | Play | Score |
| 28:13 |  | L. Henderson Goal | 91 - 31 |
| 23:26 | | S. Menegola Goal | 85 - 31 |
| 21:34 |  | K. Farrell Goal | 79 - 31 |
| 19:37 | | L. Fogarty Goal | 79 - 25 |
| 16:47 | | G. Rohan Goal | 73 - 25 |
| 11:45 | | G. Rohan Goal | 67 - 25 |
| 9:38 | | T. Hawkins Goal | 61 - 25 |
| 5:00 | | G. Rohan Goal | 55 - 25 |
| third Quarter | |||
| Time | Team | Play | Score |
| 23:03 | | M. Georgiades Goal | 49 - 25 |
| 21:07 | | T. Hawkins Goal | 49 - 19 |
| 19:12 | | C. Guthrie Goal | 43 - 19 |
| 16:03 | | Rushed | 37 - 19 |
| 14:19 | | B. Woodcock Goal | 36 - 19 |
| 13:20 | | S. Powell-Pepper Behind | 36 - 13 |
| 11:47 | | G. Miers Behind | 36 - 12 |
| 8:56 | | T. Hawkins Goal | 35 - 12 |
| 6:14 | | B. Parfitt Behind | 29 - 12 |
| 3:30 | | T. Hawkins Behind | 28 - 12 |
| second Quarter | |||
| Time | Team | Play | Score |
| 24:30 | | K. Amon Behind | 27 - 12 |
| 19:26 | | K. Amon Behind | 27 - 11 |
| 18:52 | | S. Powell-Pepper Behind | 27 - 10 |
| 13:55 | | T. Hawkins Goal | 27 - 9 |
| 11:58 | | S. Lycett Goal | 21 - 9 |
| 10:40 | | Rushed | 21 - 3 |
| 3:54 | | K. Farrell Behind | 21 - 2 |
| 2:07 | | T. Atkins Goal | 21 - 1 |
| first Quarter | |||
| Time | Team | Play | Score |
| 22:04 | | Rushed | 15 - 1 |
| 16:40 | | S. Simpson Behind | 15 - 0 |
| 12:55 | | M. Duncan Behind | 14 - 0 |
| 10:44 | | T. Hawkins Goal | 13 - 0 |
| 4:13 | | T. Hawkins Goal | 7 - 0 |
| 2:48 | | T. Hawkins Behind | 1 - 0 |
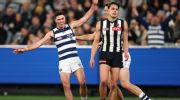
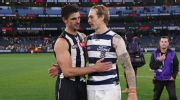
Fast-starting Geelong have withstood a Collingwood surge to claim a 25-point win and climb into the AFL top six.
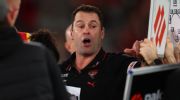
Sam Mitchell and the Hawks are on the cusp of announcing a fresh contract to remain coach until the end of 2030.
Round 21 of the 2026 AFL season kicks off with a Thursday night blockbuster between Collingwood and Geelong, before a clash between Fremantle and the Western Bulldogs on Friday.
Essendon's caretaker coach Dean Solomon will next week have his first formal discussions with club hierarchy about the fulltime job.
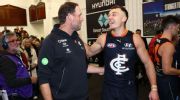
Carlton want interim coach Josh Fraser to pitch for the full-time head coaching job.
Four double-headers with AFLW matches will complete the final two rounds of the AFL home-and-away season.
| POS | Team | Pts. | % | Form |
|---|---|---|---|---|
| 1 |
 FRE FRE
|
68 | 146.0 | WLWWW |
| 2 |
 SYD SYD
|
56 | 130.0 | LWLLW |
| 3 |
 HAW HAW
|
54 | 124.0 | WLWWW |
| 4 |
 BL BL
|
52 | 120.6 | WWWWW |
| 5 |
 GEEL GEEL
|
48 | 117.2 | LLWWW |
| 6 |
 ADEL ADEL
|
48 | 113.7 | LWWWL |
| 7 |
 MELB MELB
|
48 | 107.8 | LWWWL |
| 8 |
 WB WB
|
48 | 96.8 | WLWWW |
| 9 |
 COLL COLL
|
46 | 105.6 | WWWWL |
| 10 |
 STK STK
|
36 | 105.8 | LWWLW |
| 11 |
 CARL CARL
|
36 | 92.4 | WWLLW |
| 12 |
 GWS GWS
|
32 | 98.3 | LWWLL |
| 13 |
 NMFC NMFC
|
32 | 89.6 | WLLLL |
| 14 |
 SUNS SUNS
|
28 | 94.8 | LLLLL |
| 15 |
 PORT PORT
|
24 | 95.6 | WWLLL |
| 16 |
 WCE WCE
|
16 | 70.1 | LLLLL |
| 17 |
 ESS ESS
|
8 | 65.4 | LLLWL |
| 18 |
 RICH RICH
|
8 | 60.9 | LLLLL |