


Game Information
Marvel Stadium
| fourth Quarter | |||
|---|---|---|---|
| Time | Team | Play | Score |
| 27:56 |  | D. Armitage Goal | 67 - 106 |
| 24:26 | | B. Long Goal | 61 - 106 |
| 22:40 |  | A. Neal-Bullen Goal | 55 - 106 |
| 20:46 | | R. Marshall Behind | 55 - 100 |
| 15:27 | | R. Marshall Behind | 54 - 100 |
| 8:00 | | R. Marshall Behind | 53 - 100 |
| 4:18 | | C. Oliver Goal | 52 - 100 |
| 3:07 | | S. Weideman Goal | 52 - 94 |
| third Quarter | |||
| Time | Team | Play | Score |
| 30:58 | | T. Hickey Goal | 52 - 88 |
| 27:54 | | J. Gresham Behind | 46 - 88 |
| 25:05 | | S. Weideman Goal | 45 - 88 |
| 24:09 | | C. Petracca Behind | 45 - 82 |
| 21:27 | | L. Dunstan Goal | 45 - 81 |
| 19:45 | | A. Brayshaw Goal | 39 - 81 |
| 17:21 | | T. McDonald Goal | 39 - 75 |
| 13:14 | | J. Hogan Behind | 39 - 69 |
| 12:41 | | C. Petracca Behind | 39 - 68 |
| 11:30 | | J. Harmes Goal | 39 - 67 |
| 10:27 | | M. Hannan Behind | 39 - 61 |
| 9:39 | | H. Clark Behind | 39 - 60 |
| 7:30 | | J. Hogan Goal | 38 - 60 |
| 5:41 | | T. Membrey Goal | 38 - 54 |
| 4:22 | | B. Long Goal | 32 - 54 |
| second Quarter | |||
| Time | Team | Play | Score |
| 24:50 | | Rushed | 26 - 54 |
| 23:00 | | D. Tyson Goal | 26 - 53 |
| 21:16 | | A. Neal-Bullen Behind | 26 - 47 |
| 19:06 | | T. Membrey Goal | 26 - 46 |
| 17:16 | | A. Neal-Bullen Behind | 20 - 46 |
| 13:30 | | N. Jones Goal | 20 - 45 |
| 10:22 | | T. McDonald Goal | 20 - 39 |
| 7:26 | | J. Melksham Behind | 20 - 33 |
| 6:32 | | S. Ross Behind | 20 - 32 |
| 5:51 | | D. Armitage Behind | 19 - 32 |
| 4:37 | | N. Jones Behind | 18 - 32 |
| 2:30 | | S. Ross Behind | 18 - 31 |
| first Quarter | |||
| Time | Team | Play | Score |
| 29:41 | | J. Hogan Goal | 17 - 31 |
| 23:32 | | Rushed | 17 - 25 |
| 21:02 | | D. Armitage Goal | 16 - 25 |
| 19:26 | | C. Petracca Goal | 10 - 25 |
| 14:33 | | J. Gresham Behind | 10 - 19 |
| 13:36 | | J. Hogan Goal | 9 - 19 |
| 12:14 | | M. Gawn Goal | 9 - 13 |
| 11:10 | | J. Gresham Behind | 9 - 7 |
| 9:20 | | C. Spargo Goal | 8 - 7 |
| 7:45 | | J. Gresham Goal | 8 - 1 |
| 7:03 | | P. McCartin Behind | 2 - 1 |
| 5:15 | | M. Hannan Behind | 1 - 1 |
| 3:55 | | P. McCartin Behind | 1 - 0 |
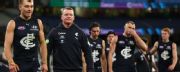
Deja vu. Groundhog day. We're running out of ways to describe Carlton's losses, and in falling to Collingwood, it's cemented that 2026 is already a wasted year in limbo, writes Rohan Connolly.
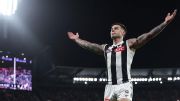
Nick Daicos' hot fourth term continues with a goal assist as Jamie Elliott puts the Pies further up in the fourth term.
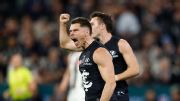
Ben Ainsworth finds himself in space and finishes off a slick Carlton passage of play with a goal.
Port Adelaide are preparing to appeal Zak Butters' fine for umpire abuse, believing the star midfielder has been branded a liar by the AFL Tribunal verdict.
Coupla Red Time site vids to add to the pile for when time permits: 13:13 - 14:15 Cox: Ginnivan 'wasn't supported in the best way' at Collingwood Mason Cox compares the current spotlight on Harley Reid to Jack Ginnivan's during his time at the Pies, say
Mason Cox compares the current spotlight on Harley Reid to Jack Ginnivan's during his time at the Pies, saying young stars need better support to handle the pressure.
| POS | Team | Pts. | % | Form |
|---|---|---|---|---|
| 1 |
 SYD SYD
|
20 | 173.3 | WLWWW |
| 2 |
 FRE FRE
|
16 | 131.4 | LWWWW |
| 3 |
 HAW HAW
|
16 | 121.0 | LWWWW |
| 4 |
 GEEL GEEL
|
16 | 116.1 | WWLWW |
| 5 |
 WB WB
|
16 | 102.0 | WWWLL |
| 6 |
 SUNS SUNS
|
12 | 132.0 | WWWLL |
| 7 |
 BL BL
|
12 | 115.0 | LLWWW |
| 8 |
 NMFC NMFC
|
12 | 105.9 | WLWWL |
| 9 |
 COLL COLL
|
12 | 94.8 | LWLLW |
| 10 |
 MELB MELB
|
12 | 92.7 | WLWWL |
| 11 |
 PORT PORT
|
8 | 110.6 | LWLWL |
| 12 |
 ADEL ADEL
|
8 | 106.4 | WLLLW |
| 13 |
 STK STK
|
8 | 91.2 | LLWLW |
| 14 |
 GWS GWS
|
8 | 86.8 | LLLWL |
| 15 |
 WCE WCE
|
8 | 64.3 | LWWLL |
| 16 |
 CARL CARL
|
4 | 79.2 | WLLLL |
| 17 |
 ESS ESS
|
4 | 76.0 | LLLLW |
| 18 |
 RICH RICH
|
0 | 56.4 | LLLLL |